Instructions
Instructions

1. Watch the fitting videos on the Cervigard.com web site
2. Adjust the cheek pads moving the track knobs simultaneous as far as possible to patient tolerance (goal is 90% of track length)
3. Putting the Cervigard on and off three times to ensure the patient has learned to put it on correctly!
4. Keep their nose equidistant between the cheek pads (no head rotation)
5. Adjust the rear fulcrum lordosis pad by turning the knob clockwise as far as patient can tolerate comfortably. You can advance this feature a little more each week until fully adjusted for maximum lordosis rehabilitation.
6. Take potential correction X-ray with the now fitted Cervigard collar on the patient to confirm your FHP correction and lordosis improvement. (Inform the patient that they will feel pressure on their cheeks as the Cervigard Collar is maximally fitted on them. Most patients are fine with it and in fact are eager to see their potential correction).

7. Older patients with djd and rigid ligament complex may require a much slower adjustment approximately half that of younger patients. Please monitor all patients closely the first 2 weeks as patients don’t always do it perfectly in the beginning. (All patients should start using the Cervigard collar in a slightly reclined sitting position)
8. Chiropractors should have the patients treated with their Cervigard FHP collar after their adjustment to enhance their spinal correction as well as doing it at home. The first 6 weeks of daily use for 20 min per day is starting protocol to remodel para spinal ligaments. Thereafter, at doctor/patient discretion!
9. Doctors who are Orthobiologic practitioners should follow the patients at least weekly for 3 weeks via office visit or phone conference to assure their patients are complying with the daily use at 20 min per day protocol and to answer any questions or concerns the patients may have.
10. Take a post lateral cervical X-ray in 6 to 10 weeks after daily collar use to confirm correction and evaluate if more time may be needed or if a 3 times per week maintenance usage can start.
Note: Any patient consultations needed with Cervigard Instructors can be made by calling Cervigard Spinal bracing Corp at 973-680-1600
1. Long hair should be put up to avoid getting tangled on the collar tracks.
2. Beards should be close trimmed to avoid getting tangled on the collar tracks.
3. Collar users should sit up straight with head back over shoulders to
compliment the collars correction of Forward Head Posture.
4. Older individuals with severe Forward Head Posture and rounded shoulders and thoracic kyphosis (hunched back appearance) can lay in a slightly reclined position to allow gravity to gently pull the head rearward. This will assist the collars performance even if the head does not get all the way back over the shoulders. Major reductions in pain are achieved with even a half inch improvement in posture!
5. People with pronounced thoracic kyphosis or cervical/thoracic scoliosis may need therapy for those conditions along with the Forward Head Posture Correction collar.
6. It is recommended to use the collar 20 minutes daily for a minimum of 6 weeks. Afterward 3 or 4 times per
week to maintain correction.
Chin up, chin back, and chest out. This allows for maximum correction of FHP with the collar on.
The reclined position is an alternative, relaxed position to wear the FHP collar successfully.

Our population will continue to use electronic devices which causes Forward Head Posture, and associated neck straightening, (text neck), neck pain, back pain, headaches, shoulder and arm symptoms.
The Cervigard FHP Correction Collar is the solution.

For use with the following conditions:


Looking down at your phone or working on the computer / laptop at a 60 degree angle is equivalent to a weight of 60 lbs on your spinal cord.
This causes malpositioned cranium and severe neck pain.

Improved Productivity
maintain time on the job
Avoid Changes to Workspace
trying to find ergonomic solutions with chairs and standing desks
Reduce Medical Costs
doctors, hospitals, epidural injections, spinal surgery
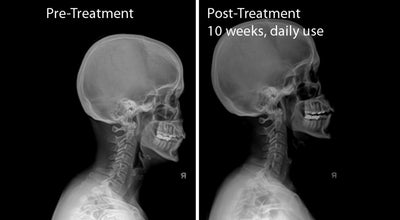
An anecdotal study was done of 17 neck pain suffering patients treated with the Cervigard FHP collar by Dr Gerard Malanga MD and Dr Ronald Dellanno.
All patients had significant pain relief on the pain index scale. Half had complete relief. These patients were from all different age groups. Some older patients had severe degenerative joint disease and still received pain relief. Patients had to use the collar for six weeks. Not all followed the daily protocols yet still received benefit.


